Thanks for choosing Grace’s cold spark machines, pls read the sparkler user manual carefully before used to get a better user experience.
(1)Due to the sparkler user manual content being limited, pls understand missed some of the detail and safety directions in using, and not undertake the responsibility of the use result for missing. (2)We will continue to focus on sparkler machines’ research, development, and technical improvement to create better experience effects, so we reserve the right to make changes to the spark machines, not do inform, the manual just for your reference, the final based on the spark machines you received.
Package Contents Included in delivery: 1 x cold spark machine; 1 x power cord; 1 x signal cable; 1xremote controller DMXInstruction
The spooktacular machines adopt a 3-pin signal wire connection (5-pin can be customized), with DMX IN and DMX OUT double interfaces, which can be used for multiple connections and is suitable for standard 512 signal control.
Please refer to the attached for the channel occupied by DMX and its description
DMX address code adjustment.
superior: Means increasing DMX address code; long press helps increase fast.
Down: Means decreasing DMX address code; long press helps decrease fast.
Note: When using DMX 512 signal control mode, each device is connected through the DMX signal socket INPUT and OUTPUT of the device. Dmx 3pin cables must correspond to each other. It is recommended to use DMX signal terminators when connecting device signals, and use double-stranded shielded cables can avoid signal interference.
Indicator Description
READY: Greenlight When the "READY" green light turns from flashing into the light on, it indicates that the machine is ready to work.
DMX: Blue light Flashing shows that the DMX signal is connected, otherwise is no signal.
FAULT: Yellow light The light is on without any malfunction.
HEAT: Red light When the machine is heating, the signal light is on.
Remote Controller
Suitable models instruction: this remote controller be suitable for all models with remote function.
Suitable machines instruction: the remote controller is suitable for the new machines, which already updated program, this remote also can control previous machines, but just do the basic control functions, and cannot realize special effects, that functions shown in black line.
Buttons usage instruction: the remote controller includes two parts, one for basic functions, and another for special effects(the functions within the black line)
➊Power:(signal connection)short press 1second has connected the machine, the display will show “FHH” after connected, then “FHH” will change to special effects address as below show, that’s connected successfully. Long press 3seconds is unconnected, the display shows “OFF”, then change to “001” as below:
➋HEAT ON/OFF: (Heat ON/OFF) press the button to start to heat, the red indicatorlight will light, the display will show the heating temperature; long press 3seconds it stops heating, the heat indicator is off, show the address code of the special effects.
➌STOP: (Emergency stop) stop do fountain.
➍CLE: (Clear powder) the machine will do clear powder for 30seconds automatically. (pls pour out the rest powder from the powder box of a machine before doing this function)
➎HIGH1/HIGH2/HIGH3: (Fountain height) high 1 - fountain lowest, high 3- fountain highest
➏Speed: (Fountain time adjustment) multi-machines do fountain effects, the fountain time of each machine is 1-3seconds, and can be adjusted by a short press before doing a fountain. ➐L-R A: from left to right each machine does the fountain in the sequence. ➑LR-M A: from the left & right side to the middle, there have two machines doing fountain at the same time. ➒M-LR A: from the middle to the left & right side, there have two machines doing fountain at the same time. ➓L-R B: from left to right increase one machine in do fountain, till all the machines are in the fountain. ⓫LR-M B: from left & right side to middle increase two machines do fountain, till all the machines in the fountain. ⓬M-LR B: from middle to left & right side increase two machines do fountain, till all the machines in the fountain. ⓭HIGH1/2/3: do special effects can adjust fountain height, will show different fountain height presses every time. ⓮+NO.-: the number of machines be an adjustment, how many machines you need to be used, then adjust the same number as used, the maximum add to fifteen machines.
Operation Instruction There have twooperation modes: DMX 512 console, remote controller
Use remote do normal fountain:
➊ Connect the power cable of the machine, then turn on the switch. ➋ Press “power” on the remote to connectto the machine, and the display shows “FHH” which means connecting successfully. ➌ Press “HEAT ON/OFF” and start to heat till the green indicator light is always in lighting. ➍ Press “HIGH1/HIGH2/HIGH3” to do the fountain.
User remote do special effects fountain:
➊ Connect power cable of the machine, then turn on the switch. ➋Press “power” on the remote to connectto the machine, and the display shows “FHH” which means connecting successfully. ➌To adjust each machine special effects address code by each machine
address code button as picture show;the display will show the number or letter(A、B、C、D、E、F are correspond number10 to 15 respectively), like below picture show “3” means this is the third machine.
➍Press “+NO.-” to adjust the number of machines be used, the display will show a number or letter(A、B、C、D、E、F are corresponding numbers 10 to 15 respectively), as the below picture shows the right number “4” means total machines qty, the number must be adjusted to meet your need used machines qty.
➎Press the “Heat ON/OFF” button to start to heat, till the green indicator light is always in lighting, then can do fountain, the display will show heating temperature. ➏Press special effects A or B buttons will have related special effects.
Eg: there have eight machines doing special effects, then the program will show as below:
F18 F28 F38 F48 F58 F68 F78 F88
Console operation:
➊Connect the power cable and DMX signal cables of the machine, turn on the green button, and DMX blue indicator light in lighting, then connected the DMX signal successfully. ➋The first channel push to top start heating, till the green indicator light always in lighting, then can do fountain. ➌Push the second channel do the fountain.
Remark: For the detailed channel instruction, pls refer to the attached channel operation; if need to use the console to do special effects, then need do program by yourself.
Consumables
The consumables are classified as:
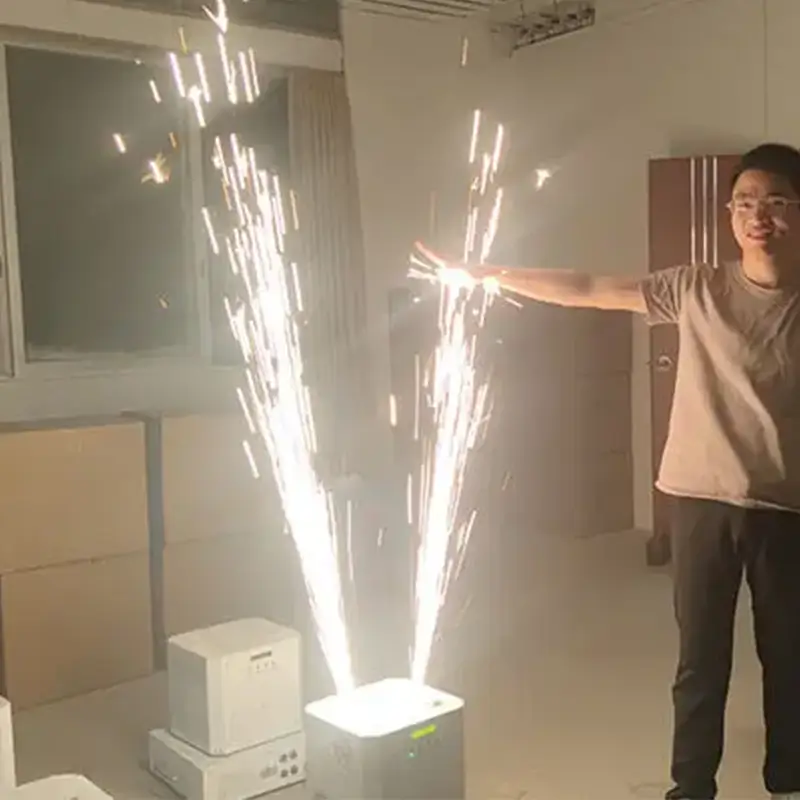
SMALL: the sparkler jet height is 1.0-3.5m (error 0.5m), and the spot is rarely dropped, use indoors. LARGE: the sparkler jet height is 2.0-5.0m (error 0.5m), and the sprayed spot has dropped ground, use for outdoor.
Consumables choice: Consumables are the customized formula for the test of our machine. Please select our consumables to avoid affecting the effect of the machine; (No warranty service is provided for machines damage caused by consumables ,not from our company).
Consumables save: Consumables should be kept in a dry and sealed environment to prevent moisture.(wet and sundry consumables should not be used)
Consumables add: Pls stop running the machines before adding the consumables, to avoid accidental injury.
Clean and Maintenance
Clear powder: Pls empty the remaining consumables after use, and power on the use Clear Powder process to clear the remaining material by remote controller or DMX controller. (Note: problems caused by improper cleaning will not be covered by the free warranty).
Dust net cleaning:Please clean the dust net regularly, to avoid
block the dust net and influence heat dissipationof the machine.(The dust screen can be removed directly from the outside)
External cleaning:Please wipe the machine gently with soft cotton, to avoid scratching the machine housing.
Internal cleaning:There has a clear hole at the bottom of the machine, through which the internal dust can be poured out.
After-sales
Warranty:1 Year(Subject to the date of manufacture)
Each sparkler machineis affixed with the factory code. The factory code shall be provided when enjoying the warranty service. It is invalid if torn.
It’s may need to provide some videos or pictures to confirm the problems Fault light (yellow) display and processing method
Display content
Fault causes
Solution
E01
Heating failure
1:Check if the heat dissipation plate is normal. 2: Replace the heat dissipation plate or heating board.
E02
Heating is not controlled
Replace the heating board.
E03
The internal temperature of the machine is extremely high
1:Check the cooling fan. 2: stop heating and operating, restart after 10 minutes.
E04
The air blower does not work
1:Check if there is any foreign object falling into the nozzle. 2: Replace the air blower motor.
E05
The sensor is faulty
1:Check sensor socket. 2: replace the sensor.
E06
Anti-tilt safety function is enabled
1: Pls restart the machine, don’t tilt machine again after power on.
E07
Safety protection of blower motor
Shut down the machine to check whether the blower motor is working properly
Note:when the fault light is on, pls turn off the power of the machine in time, to avoid extra damage, and usersare expected to restart the machine until the fault light is off. Warnings and Cautions
The machine's built-in protection procedures will stop the auto. once do fountain over the 30s each time. If need it to work again, please operate the second channel again. If the continuous shooting time is too long, the internal temperature will rise sharply and cause permanent damage. Suggest not do continuous shooting over 1minutes.
2) Max connection is 6 pieces via power connecting cables, too many devices working together will cause damage or fire. 3) If there is no spark out with enough consumables or other abnormal situation, pls stop running the machine and contact the after-sale service for help. 4) After using the machines, do not immediately turn off the power. The heat-dissipating fan should take out the internal air when the power is on. Otherwise, the internal heat is quickly transmitted to the surface of the housing. 5) Please place the equipment in an open place and keep a safe distance of more than 5 meters from the personnel. 6) Make sure the device is offbefore filling the consumables 7) If the consumables are accidentally ignited, please use the sand to extinguish, do not use water. 8) Damage caused by improper use or human factors is not covered by the warranty. 9) The final interpretation right belongs to our company. Attached as below Ground Small650W